This tutorial briefly introduces 3 methods to load the example data FAA into Cloudberry Database tables you have created in the previous tutorial Lesson 3: Create Tables. Before continuing, make sure you have completed the previous tutorial.
-
Method 1: Use the
INSERTstatement. This is the easiest way to load data. You can executeINSERTdirectly in psql, run scripts that haveINSERTstatements, or run a client-side application with database connection. It is not recommended to useINSERTto load a large amount of data, because the loading efficiency is low. -
Method 2: Use the SQL statement
COPYto load data into database. TheCOPYsyntax allows you to define the format of the text file so that data can be parsed into rows and columns. This method is faster than theINSERTstatement. But, likeINSERTstatement,COPYis not a parallel data loading process.The
COPYstatement requires that external files be accessible to the host where the master process is running. On a multi-node Cloudberry Database system, data files might reside on a file system that is not accessible from master node. In this case, you need to use the psql command\copy meta-commandthat streams data to Cloudberry master node overpsqlconnection. Some example scripts in this tutorial use the\copy meta-command. -
Method 3: Use Cloudberry Database utilities to load external data into tables. When you are working with a large-scale data warehouse, you might often face the challenge of loading large amounts of data in a short time. The utilities,
gpfdistandgpload, are tailored for this purpose, enabling you to achieve rapid, parallel data transfers.During your data loading process, if any rows run into issues, they will be noted. You can set an error threshold that fits your needs. If the number of problematic rows exceeds this limit, Cloudberry Database will stop the loading process.
For optimal speed, combine the use of external tables with the parallel file server (
gpfdist). This approach will help you maximize efficiency, making your data loading tasks smoother and more efficient.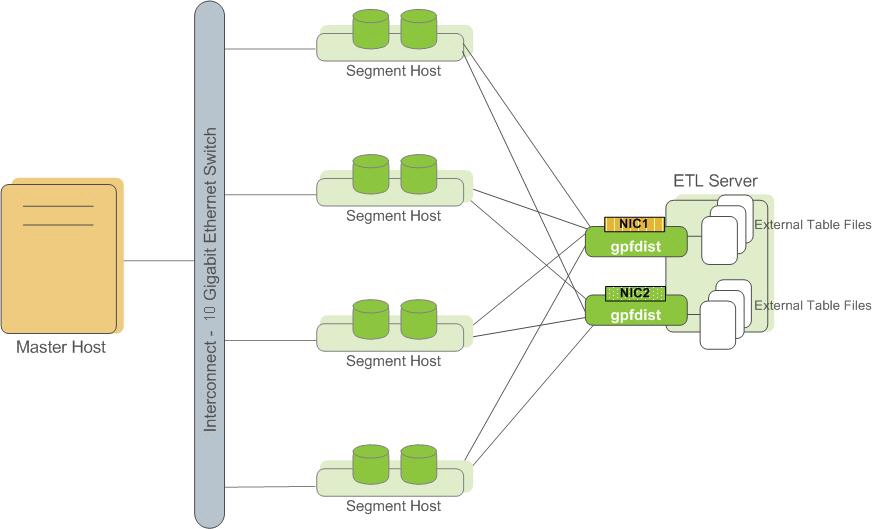 Figure 1. External Tables Using Parallel File Server (gpfdist)
Another utility
gploadis a batch job. When using this utility, you should specify a YAML-formatted control file, describe source data locations, format, transformations required, participating hosts, database destinations and other particulars in the file.gploadwill parse the control file and usegpfdsitto execute the task. This allows you to describe a complex task and execute it in a controlled and repeatable way.
Quick-start operations
In the following exercise, you will load sample data into the tutorial database using each of these above methods.
Load data using INSERT
In Lesson 3: Create Tables, you have created 6 tables in the tutorial database, one of which is d_cancellation_codes in the faa directory.
The faa.d_cancellation_codes table is a simple 2-column look-up table. You will load data into the table using the INSERT statement.
-
Log into Cloudberry Database in Docker as
gpadmin, and change to thefaadirectory. This directory containsfaadata and scripts.[gpadmin@mdw ~]$ cd /tmp/faa -
Log into the
tutorialdatabase aslily.[gpadmin@mdw faa]$ psql -U lily -d tutorialPassword for user lily: # changeme
psql (14.4, server 14.4)
Type "help" for help.
tutorial=> -
Check the
faa.d_cancellation_codestable.tutorial=> \d d_cancellation_codesOutput:
          Table "faa.d_cancellation_codes"
   Column    | Type | Collation | Nullable | Default
-------------+------+-----------+----------+---------
 cancel_code | text |           |          |
 cancel_desc | text |           |          |
Distributed by: (cancel_code) -
Insert data into the
faa.d_cancellation_codestable.tutorial=> INSERT INTO faa.d_cancellation_codes
tutorial-> VALUES ('A', 'Carrier'),
tutorial-> ('B', 'Weather'),
tutorial-> ('C', 'NAS'),
tutorial-> ('D', 'Security'),
tutorial-> ('', 'none');Output:
INSERT 0 5
tutorial=>
Load data using COPY
The COPY statement moves data from the file system to database tables. Data for 5 of the faa tables is in the following CSV-formatted text files:
-
In a text editor, open and check the following
.csvdata files.L_AIRLINE_ID.csvL_AIRPORTS.csvL_DISTANCE_GROUP_250.csvL_ONTIME_DELAY_GROUPS.csvL_WORLD_AREA_CODES.csv
Note that the first line of each file contains the column names, and that the last line of each file contains the characters
., which signals the end of the input data. -
In a text editor, open and check the following SQL scripts:
copy_into_airlines.sqlcopy_into_airports.sqlcopy_into_delay_groups.sqlcopy_into_distance_groups.sqlcopy_into_wac.sql
-
Log into the
tutorialdatabase aslily.[gpadmin@mdw faa]$ psql -U lily -d tutorialPassword for user lily: # changeme
psql (14.4, server 14.4)
Type "help" for help.
tutorial=> -
Run the following psql
\icommands to load data into thefaatables.tutorial=> \i copy_into_airlines.sql
tutorial=> \i copy_into_airports.sql
tutorial=> \i copy_into_delay_groups.sql
tutorial=> \i copy_into_distance_groups.sql
tutorial=> \i copy_into_wac.sqlOutput:
COPY 1514
COPY 1697
COPY 15
COPY 11
COPY 342
tutorial=>
Load data using the gpdist utility
For the faa fact table, you will use an ETL (Extract, Transform, Load) process to load data from the source gzip files into a data table. For the best loading speed, use the gpfdist utility to distribute rows to segments.
In production system, gpfdist runs on file servers that external data resides. However, for a single-node Cloudberry Database instance, there is only one logical host, so you run gpfdist on it as well. Starting gpfdist is similar as a file server, no data movement will occur until SQL query request has been ended.
Note:
This exercise loads data using
gpfdsitto move data from external data files into Cloudberry Database. Moving data between the database and external tables also needs security request. Therefore, only superusers are permitted to usegpfdsitand you will complete this exercise asgpadminuser.
-
Start
gpfdist:[gpadmin@mdw tmp]$ gpfdist -d /tmp/faa -p 8081 > /tmp/gpfdist.log 2>&1 &In this operation:
-d /tmp/faa: Specifies the directory where the data files reside. The utility will serve the files from/tmp/faa.-p 8081: Sets the port on whichgpfdistwill listen, in this case, port8081.> /tmp/gpfdist.log: Redirects standard output to a log file at/tmp/gpfdist.log.2>&1: Ensures that both standard output and standard error are redirected to the same log file.&: Runs the process in the background.
Once executed, you see
6581, which indicates the background job number[1]and its process ID6581. -
Check the running processes:
[gpadmin@mdw tmp]$ ps -ef |grep gpfdistThis command checks whether
gpfdistis running:gpadmin 6581 6552 0 16:02 pts/8 00:00:00 gpfdist -d /tmp/faa -p 8081
gpadmin 6585 6552 0 16:02 pts/8 00:00:00 grep --color=auto gpfdist -
View the log file:
[gpadmin@mdw tmp]$ more /tmp/gpfdist.logThis command allows you to view the contents of the
gpfdist.logfile. The log messages indicate the initialization steps of thegpfdistutility:2023-07-25 16:02:41 6581 INFO Before opening listening sockets - following listening sockets are available:
2023-07-25 16:02:41 6581 INFO IPV6 socket: [::]:8081
2023-07-25 16:02:41 6581 INFO IPV4 socket: 0.0.0.0:8081
2023-07-25 16:02:41 6581 INFO Trying to open listening socket:
2023-07-25 16:02:41 6581 INFO IPV6 socket: [::]:8081
2023-07-25 16:02:41 6581 INFO Opening listening socket succeeded
2023-07-25 16:02:41 6581 INFO Trying to open listening socket:
2023-07-25 16:02:41 6581 INFO IPV4 socket: 0.0.0.0:8081
2023-07-25 16:02:41 6581 INFO Opening listening socket succeeded
Serving HTTP on port 8081, directory /tmp/faa
The following operations are performed in this section:
-
Set up the necessary tables.
First, we'll create two tables:
faa_otp_load: The table where data will be loaded.faa_load_errors: A table to log any load errors.
These operations are purely metadata-based; no actual data will be transferred at this point.
[gpadmin@mdw tmp]$ cd faa
[gpadmin@mdw faa]$ psql -U gpadmin tutorial

tutorial=# \i create_load_tables.sql
Note: If you receive an error that the
faa_load_errorstable already exists, you can safely ignore it. -
Load data from external files.
The
faa_otp_loadtable is structured to match thefaaWeb site's input data format. The external table definition will refer to files in thefaadirectory with a patternotp*.gz. For our example, we have two matching files, one for December 2009 and the other for January 2010.Now, let's move the data:
tutorial=# \i create_ext_table.sql
tutorial=# INSERT INTO faa.faa_otp_load SELECT * FROM faa.ext_load_otp;
Note: Cloudberry Database facilitates moving data from the gzip files into the database's load table. In a production setting, there might be several
gpfdistprocesses running, either on separate hosts or multiple on one host, each using a different port. -
Examine load errors.
Errors during data loading are common. Let's examine these errors for a better understanding. For clarity, we'll display results in a format where each column data is shown on a new line:
tutorial=# \x  -- Changes the display of the results to one line per column, which is easier to read for some result sets.
tutorial=# select DISTINCT relname, errmsg, count(*) from gp_read_error_log('faa.ext_load_otp') GROUP BY 1,2;
Once you have reviewed the errors, you can end your session:
tutorial=# \q
[gpadmin@mdw faa]$
Summary: By now, you should have set up your tables, loaded the data, and had a quick look at any loading errors. This ensures that you have a good understanding of the data quality and structure.
Load data using the gpload utility
Cloudberry Database provides a wrapper program for gpfdist called gpload that does much of the work to set up external table and data movement. In this exercise, you will reload the faa_otp_load table using the gpload utility.
In this section, we walk through the process of loading data with gpload. The steps are:
-
Ensure the environment is clean.
Before using
gpload, ensure nogpfdistprocesses from previous tasks are running. Here is how you can check and kill them:[gpadmin@mdw faa]$ ps -ef | grep gpfdist
[gpadmin@mdw faa]$ pkill gpfdist
[gpadmin@mdw faa]$ ps -ef | grep gpfdist -
Customize the
gploadinput file.You will need to edit and tailor the
gpload.yamlinput file to your needs. Notably, make sure to set the correct path for thefaadirectory. In this guide, thegpload.yamlfile has theTRUNCATE: truepreload instruction. This ensures that any previously loaded data is cleared out before the current loading begins.The following is what the
gpload.yamlfile might look like:[gpadmin@mdw faa]$ cat ./gpload.yaml
---
VERSION: 1.0.0.1
# describe the Greenplum database parameters
DATABASE: tutorial
USER: gpadmin
HOST: mdw
PORT: 5432
# describe the location of the source files
# in this example, the database master lives on the same host as the source files
GPLOAD:
INPUT:
- SOURCE:
LOCAL_HOSTNAME:
- mdw
PORT: 8081
FILE:
- /tmp/faa/otp*.gz
- FORMAT: csv
- QUOTE: '"'
- ERROR_LIMIT: 50000
- ERROR_TABLE: faa.faa_load_errors
OUTPUT:
- TABLE: faa.faa_otp_load
- MODE: INSERT
PRELOAD:
- TRUNCATE: true -
Run the
gploadcommand.Finally, you can run the gpload command to start the data loading process. If you want a detailed view of the loading, include the -v flag.
[gpadmin@mdw faa]$ gpload -f gpload.yaml -l gpload.logSummary: At the end of this guide, you would have successfully used gpload to load data into CloudberryDB. Make sure to check the logs for any warnings or errors to ensure data consistency and integrity.
Create and load fact tables
The final step of the ELT process is to move data from the load table to the fact table. For the FAA example, you create 2 fact tables. The faa.otp_r table is a row-oriented table, which will be loaded with data from the faa.faa_otp_load table. The faa.otp_c table has the same structure as the faa.otp_r table, but is column-oriented and partitioned. You will load it with data from the faa.otp_r table. The 2 tables will contain identical data and allow you to experiment with a column-oriented and partitioned table in addition to a traditional row-oriented table. Then you create the faa.otp_r and faa.otp_c tables by executing the create_fact_tables.sql script. Load the data from the faa_otp_load table into the faa.otp_r table using the INSERT FROM SQL statement. Load the faa.otp_c table from the faa.otp_r table. Both of these loads can be accomplished by running the load_into_fact_table.sql script.
[gpadmin@mdw faa]$ psql -U gpadmin tutorial

psql (14.4, server 14.4)
Type "help" for help.
tutorial=# \i create_fact_tables.sql
CREATE TABLE
CREATE TABLE

tutorial=#
tutorial=# \i load_into_fact_table.sql
INSERT 0 1024552
INSERT 0 1024552
tutorial=#
Data loading summary
-
Key Feature: rapid data loading
- Extract, load, and t ransform (ELT): This method takes advantage of the massive parallelism of Cloudberry Database.
- Staging: Data can be staged using methods like external tables.
- Transformation: Data transformations occur within the Cloudberry Database.
- Performance: Set-based operations are done in parallel to maximize efficiency.
-
Loading mechanisms
COPY: Loads data via the master in a single process, but doesn't harness CloudberryDB's parallel capabilities.- External tables:
- Advantage: Takes advantage of the parallel processing power of segments.
- Flexibility: One
SELECTstatement can access multiple data sources. - Data availability: Makes static data accessible within the database.
- Protocols: Defined using
file:// or gpfdist://. gpfdist: A parallel-loading file server program.- Static data: External tables can be re-scanned during a query as data remains unchanged.
-
External web tables
-
Features:
- Protocols: Allows the
http://protocol or anEXECUTEclause for OS command/script execution. - Dynamic data: Assumes that data might change during query execution. Thus, rescanning is not permitted.
- Performance: Might be slower if data exceeds memory capacity, leading to I/O operations.
- Execution: Scripts or processes might run on every segment host.
- Protocols: Allows the
-
Duplication caution:
- There is a risk of data duplication, especially when extracting data from another database.
- Users need to be cautious and verify data when using Web tables.
-
Understanding and using these features and mechanisms effectively can ensure optimal data loading and management within the Cloudberry Database.
What's next
In this tutorial, you learned how to load data into Cloudberry Database. You learned about the different loading mechanisms and how to use them. You also learned how to use the gpload utility to load data. Finally, you learned how to create and load fact tables. You can now move on to the next tutorial, Lesson 5: Queries and Performance Tuning, to learn about query performance tuning in Cloudberry Database.
Other tutorials:

